another doll making tip..

This tip really helped me quicken my doll making process and I only figured it out about 2 years ago. It’s so simple but I’ve never seen it in any dollmaking how-to’s. Anyways, it only works if you use a type of pattern like mine which is the arms attached to the ‘muff’ of the head and then attached into the body.

So, while you are stuffing your body only stuff the midsection of the doll a third or a half way full. Then you attach your neck onto the doll- see how easy this is? For years I would try pushing the dolls head and arms down the body section but it was so difficult because I had filled the body with so much wool. The I would try using a bunch of pins to hold it down but then I’d always end up stabbing myself with one of them. Anyhow, attach your head and sew up one arm and then…

           bodystuffing.jpg

           boddystuffing2.jpg

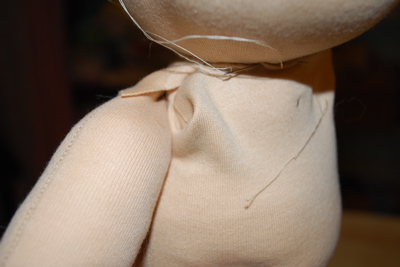
Stuff the remainder of the body cavity through the arm hole using a long piece of wool that you can push down with your finger into the body. I like one long piece as opposed to lots of little pieces because I tend to get a smoother look that way. I do use little bits though to ‘fill in’ behind the shoulders and under the arms.

           bodystuffing3.jpg

I’m a great fan of ‘Keepin’ it Real’ as my friend Catherine would say. So here is a shot for the rest of us crafters! I am in such admiration of crafters who are organized, so organized.. We all must have drooled over this amazing organized insanity of Hillary , I couldn’t believe it- so jealous of her stash, just beautiful. And how about this one on the lovely Two Cheese Please (new fav blog!), lol..did you see my basket of tangled floss a few posts ago? This is one of three racks of insane fabric that I have stashed away, behind curtains natch!

           fabric-insanity.jpg

BTW, if there are any other dollmaking tips you’d like to see please let me know, I’d love to post about them. Except hair..that one is too weird and hard to try to explain. Maybe I can do it when Jasper isn’t teething anymore and I have more brain capacity.

Great big thank you to Poopsy and Woo for this bit of love.. 

And another big thanks to Amy for some love over here..


Posted

in

by

Tags:

Comments

36 responses to “another doll making tip..”

  1. Monica Avatar

    I *love* that you share these tips. I love seeing how things get put together! One day, when I get brave, I’m going to try making a doll. I’m sure I’ll be emailing you for support. lol Your fabric stash behind the curtain thrills me. You should see my yarn stash. 🙂 It looks similar, except it’s behind a door…with a child proof latch. My little bear broke in once, and it was a real (tangled) mess.

  2. Meike Avatar

    Thanks for the tip! I imagined there HAD to be an easy way (or everyone would have stopped making dolls with arm-muffs by now…), only I couldn’t figure it out by myself… Which is silly, because as you say, it’s so simple! You just have to know. Thank you, thank you!

    *grins* I LOVE your closet. Makes me feel a lot better about my overflowing-my-goodness-what-am-I-going to-do-with-all-this-stuff-closet in our living room. Now please help my husband understand! 🙂

  3. pascaline Legros Avatar
    pascaline Legros

    Dear Christine, I wish I knew how to sew… so i could try to make a beautiful doll like yours but i guess you need first to sew and be creative… which unfortulately i am not that good at… so i will keep dreaming of your dolls and read about them via your blog… have a lovely day and i hope you slept better last night…

  4. Christine Avatar

    Hm, interesting tip. I don’t do it that way. Perhaps I should study your photographs more careful and try.
    I love your secret behind that curtain! I have the fabric in plastic bags, it’s disgusting. Lol. 🙂

    Christine
    PS: perhaps this is one of great Bamboletta secrets, but I am curious what you do to get that nose. My dollbook says a nose will cause the fabric to rip or tear more quickly so they do not recommend it, but it looks so cute!

  5. Donna S. Avatar
    Donna S.

    Just found your blog. I love your dolls!! I have 2 grand daughters. Wow…wonder if I could ever do that.

  6. Holly Avatar

    I promise you, while i’m anally retentive about my embroidery floss, my fabric stash looks like a bomb went off in the middle of it! I wish I lived closer so we could have a cup of tea and a chat and I could play with your big bowl of floss – it’s like pullilng out treasure after treasure when it’s all in together like that!

    ~Holly
    Two Cheese Please

  7. stephanie Avatar
    stephanie

    Thanks for the awesome tip! And my question was going to be “the hair.” Maybe you just need to hold a “hair workshop.” I’d fly in from Utah for that one:)

    stephanie

  8. admin Avatar
    admin

    Thanks everyone! I love giving out the tips 🙂 I am happy to not be alone in my unorganization of fabric/yarn. Monica, when Jasper is sleeping I get Kristie my sitter to come down and organize my yarn..she has to do it about once a week I am that ridiculous!
    Meike.. I know it’s so simple, but such a good tip!
    Christine, some noses can break through the ‘skin’. I just fixed a commercial waldorf doll recently for my friends daycare that had that happen. If you make a soft nose that is squishy then it won’t wear through. I hope that helps.
    Hello Pascaline!
    Welcome Donna- sure you can do it, it’s so fun and your grand daughters would love it!
    Hey Holly! I’d love to have you come over and organize the floss 🙂 I’ll even throw in some chocolate. It’s funny they are like that- I have a bobbin winder and everything.
    Yes, the Hair- Stephanie, I get emails almost daily asking about the hair… it’s a difficult one to explain- I will one day!

  9. Berrie Avatar

    Ha! My fabric shelves are the same as yours! No really. The same shelves and the same piles. I also do a version of your current “doll making tip”. I, too, learned the hard way. How cool are we?

    xoxoBerrie

  10. April Avatar

    Great tip, though I tried it this way over the weekend, it didn’t work so well for me! I have two questions if you’re looking for blog content – do you sew the leg seams by hand (the parts where the legs meet the torso at the top of the leg) or by machine? I tried by machine and ended up with a terrible mess. Second question: How do you make that part under the chin so smooth? I struggle with this part!

    Thanks!
    April

  11. admin Avatar
    admin

    Berrie, we should start our own group or something for messy crafters! Yes, the dollmaking tip is a good one. I remember when I first tried it, I called John at work. He did not share the same excitment as myself but_ I had to tell someone! Next time I’ll tell you..Oh, I’ve got one- I figured out how to dye mohair a copper colour! yeah!
    April.. too bad about the tip not working for you. I do sew the leg seams by hand and to not get the ‘Ghost Neck’ I actually did a blog post about it last month explaining how to prevent it. With pictures!

  12. Berrie Avatar

    Too funny! All this wonderful work we do and the group we start is “messy crafters unite”! Oh please share your new and exiting discoveries. I’ll share mine!. Your revelation for dyeing copper hair, though, is useless without giving up the secret. Bah!

    xo Berrie

  13. hillary Avatar

    ha 🙂 the secret to my organization is suckering a poor unsuspecting houseguest into folding and color sorting the teetering mess that was my fabric closet.

    I get emails about yarn hair all the time too. I think it’s one of those things that seems like such a mystery until you jump in and try it. what I still don’t understand is that crocheting a cap and pulling the hair through thing that some waldorf doll makers do. I’d like to see that in action!

  14. Elizabeth Avatar
    Elizabeth

    Great tip!! I was wondering if you could tell me if your doll hair is sewn in at the part or if you do the crochet cap thing. I am debating which I should try. I want a full head of style-able hair, any suggestion?

  15. Clothes Hangers Avatar

    Anything that you have just stuck in your closet for lack of a better place for it needs to be removed from your home or given a proper location.

  16. margarita Avatar

    Hi, where I can find the Waldorf patterns?

  17. Grazia Avatar
    Grazia

    Before all, excuse m poor english.
    I’ve saw your dolls and are wonderful. I’m dollmaker and I send my dolls to Uganda to Lira Babbies Home, where leave 34 little babys who have no parents.
    Is it possible to have the pattern of your little doll? I thank you very much if you will reply to be.
    Greetengs to you and your family
    Grazia fron Italy ( Liguria )

  18. Cecelia Avatar
    Cecelia

    That is an excellent tip. Thanks so much. I’m about to embark on my first doll making experience and that tip will help so much.

  19. elizabeth c. Avatar
    elizabeth c.

    Your dolls are just the sweetest around! I would love a tip for the mouth…I am only making my second doll, but I cannot tell you how many times I have done the mouths. I cannot get that nice slight smile. I can get a straight line, a ‘V’ (from a little stitch), or i have to make a bunch of tiny stitches.

  20. Vicki Avatar

    Thanks so much for sharing all the great tips/how-tos! I am making my first doll (of this style) and I’m nervous and want it to be perfect–it’s for my 2-year-old daughter for Christmas. I got the head done with no ghost neck, thanks to you, and I’m getting ready to sew the head/arms into the legs/body section so this is great! I was wondering if you’d be willing to make a tutorial menu or some other way to find all your tips quickly! Also, have you considered selling patterns or kits for your dolls? Or even just the fabric and wool stuffing to make them? Thanks again, so much!

  21. […] Bamboletta provides a tutorial on attaching the arms to the body. […]

  22. Rebecca Billington Avatar
    Rebecca Billington

    just found this post and have to say…

    thank you…….I love you!

  23. Linzy Avatar
    Linzy

    What a great tip thank you… I was doing it allll wrong.

  24. Stephanie Potter Avatar
    Stephanie Potter

    thanks for the tips. Do you think you could explain how to do hair. I am sure it is easier than the crochet cap method and must use less yarn.

  25. filiberto …

    […]bamboletta: natural, handcrafted companions for little ones – » Blog Archive » another doll making tip..[…]…

  26. printing for less…

    […]bamboletta: natural, handcrafted companions for little ones – » Blog Archive » another doll making tip..[…]…

  27. fayrouz daw Avatar

    thank you so much for your experience and this tips thanks again

  28. Linzy N Avatar
    Linzy N

    Thank you for sharing that tip… now how do you make the chins not wrinkly?

  29. Ann Power Avatar
    Ann Power

    Is there a doll pattern that we can purchase to make our own bamboletta dolls?

    Thank you,
    Ann Power

  30. adult match maker…

    […]bamboletta: natural, handcrafted companions for little ones – » Blog Archive » another doll making tip..[…]…

  31. […] from the Heart) Step-by-step on Flickr (Beth @toureasy47201) Outie bellybutton (Rhythm and Rhyme) Sewing up shoulders (Bamboletta […]

  32. […] from the Heart) Step-by-step on Flickr (Beth @toureasy47201) Outie bellybutton (Rhythm and Rhyme) Sewing up shoulders (Bamboletta Dolls) Bamboletta Buns(Bamboletta YouTube […]

  33. anna Avatar
    anna

    I would love a tip: the horizontal line on my doll’s faces tends to show through. Any ideas?

  34. admin Avatar
    admin

    Hi Anna,

    Sorry for the late reply, try switching to a thicker fabric for the skin 🙂
    Thank you,

    Brooke 🙂

  35. Rebekah Avatar
    Rebekah

    This might sound like a “lazy question”, but I swear that I’ve looked with no luck…how can I find any and all of your other doll making tutorials? And has there been a hair tutorial yet?! I’m about to order supplies for my first ever doll and am collecting as much knowledge ahead of time as I can. I’ve found it especially hard to find good tutorials on hair and wigs, muff/arm/shoulder construction (though now I can cross that one off my list!), and feet -esp feet with a bottom piece/sole-. I’m planning to alter patterns/create my own because I haven’t for the life of me been able to find one that is “just right”, or any pattern shaped/pieced feet (rather than stitched).

    Thanks SO much for sharing tips and photos… I couldn’t believe how hard it was to find good info on doll making from seasoned doll makers (and esp from professional studios)… You Rock!!

    With Gratitude,
    Rebekah

  36. Danyel Avatar
    Danyel

    Dear ladies at bamboletta,

    I have made a few dolls myself and I have one question for you. How do you make the stitches so nice looking at the neck? I struggle with this, if you want to share any tips, I would appreciate it soooo much!
    Thanks!
    Danyel , aspiring doll maker.

Leave a Reply

Your email address will not be published. Required fields are marked *